


 Robotparts

Tips & Tricks
iRobot® and Robomow® must ensure that the vacuum cleaners and the mops and lawn mowers function properly everywhere. Not every house is the same, neither has the same floors, nor the same occupants. Sometimes that is a bit much to ask and the robots run into problems.
In this section you will find Tips & Tricks from practice. A list of problems and solutions for Cyberhuis customers.


A clean Roomba® lasts longer.
It is wonderful that you do not have to vacuum yourself, but robot vacuuming is not completely automatic, unfortunately.
We see Roomba's® worn out from use, as well as brush motor decks worn out because owners were unaware that they had to regularly remove the bearings to clean the shafts underneath. If you have a lot of pets or people with long hair in the house, it is highly recommended to clean your Roomba® regularly. See the tips below.
- Side brush clean? > Remove hair that is wrapped around it.
- Is the front wheel clean?> Pull the entire front wheel module out of Roomba®, remove the wheel from the holder and possibly also the axle. Just clean and click everything back.
- Is the filter still clean? > Officially when used twice a week, a filter should last for 3 months. We notice that this is very tight and a filter often has a much longer life. Gently knocking out just out of the filter after use and perhaps cleaning occasionally with a vacuum cleaner or compressor will give your filters an even longer life.
- Is there no dirt under the yellow bearings of the brushes in the brush motor deck? Via this link we explain how you can keep the brushes in the brush motor deck clean. This explanation is old, intended for a Roomba 500, but still current for all models. https://www.cyberhuis.nl/nl/service/roombas-schoonmaken/
Oh Oh .. Black carpet or an abyss?
Depth sensors from iRobot® vacuuming and mopping robots are located under the machines. They ensure that they do not fall down the stairs. The sensors respond to light reflection. If no light returns to the sensor, the robot immediately stops its work. However, deep black carpet also does not return light to the sensor, with the result that the Roomba® does not work on black carpets. In the first years we used tape to block the sensors when problems like these arose, but we stopped doing that because the high risk of a machine falling down the stairs.
Another tip. If you have a small raised edge at the top of the stairs, first test very well whether the depth sensor responds well there. If the edge is too high, the machine will be lifted too much so that it is unclear that there is an abyss. If you have any doubts as to whether this will always go well, we recommend that you close the stairwell with a virtual wall.
Newer models also have better depth sensors. We testen s9 and the i7's at Cyberhuis on black floor mats. That did not cause any problems. If you would like advice or a test, please contact us.
Handy an App, but how should I make a map?
The new machines have handy maps, but creating a good map takes some patience and work. These steps are for the i7 and S9. Other machines follow similar procedures.

Choose the following steps for a perfect map:
- Remove the side brush from Roomba®. This prevents a lot of dirt from sticking to it during the first round.
- Raise as many chairs, other furniture or loose items as possible. An empty floor gives the best card.
- Open all doors to the rooms where the robot will be working after the map is finished.
- If you haven't already: Install your Robot, go through all the steps and once the Robot is installed in your app, choose> Map.
- If you haven't already: Install your Robot, go through all the steps and once the Robot is installed in your app, choose> Map.
- Choose start mapping.
Often two or three card rounds are required (sometimes even more, depending on the home). As soon as your card is ready, the app will indicate this. With the more expensive machines you can then name your rooms in the app and / or indicate places where the Roomba® is not allowed.
The spaces in my house are so similar that Roomba® refuses to make a map. How do i solve this?
Recently, we faced the following problem. Someone has two spaces of approximately the same shape. What to do ... The robot refused to make the map because both rooms had the same shape. We have taken the following steps to trick the Robot.
- Remove the map from Room 2.
- Narrow the space with help of a virtual wall or some other barriers. So the Room will be smaller and different in the Robot's 'eyes'.
- Make a map according to the Staps above > how to make a 'perfect map'.
- As soon as Roomba® has finished making a room, add a complete different name as in Room 1.
- Move the barriers a bit every time the Roomba® finds his way through Room 2, until the final map is finished. Small steps are recommended.
This way your Robot should be able to vacuum both Rooms.
My map is damaged after updating my phone. Do I have to make a map all over again?

That is highly recommended, depending on how many pieces have disappeared from the map. The vacuum cleaner will always avoid the unknown places. It is possible to gently slide the robot into lost spaces. Then the machine learns those pieces again, but it is quite a job to keep moving the robot with your foot to the piece of map that has disappeared from the app. It will probably take less time to read the card again.
You can do a deep reset as follows:
- Go to the iRobot® app of your robot James or Dotty, in short, to your robot whose card you want to restore.
- Near the bottom of the page, choose> Robot settings.
- At the bottom, choose> Remove robot / restore factory settings.
- Learn the map again, using the tips above for how to make a 'Perfect Map'
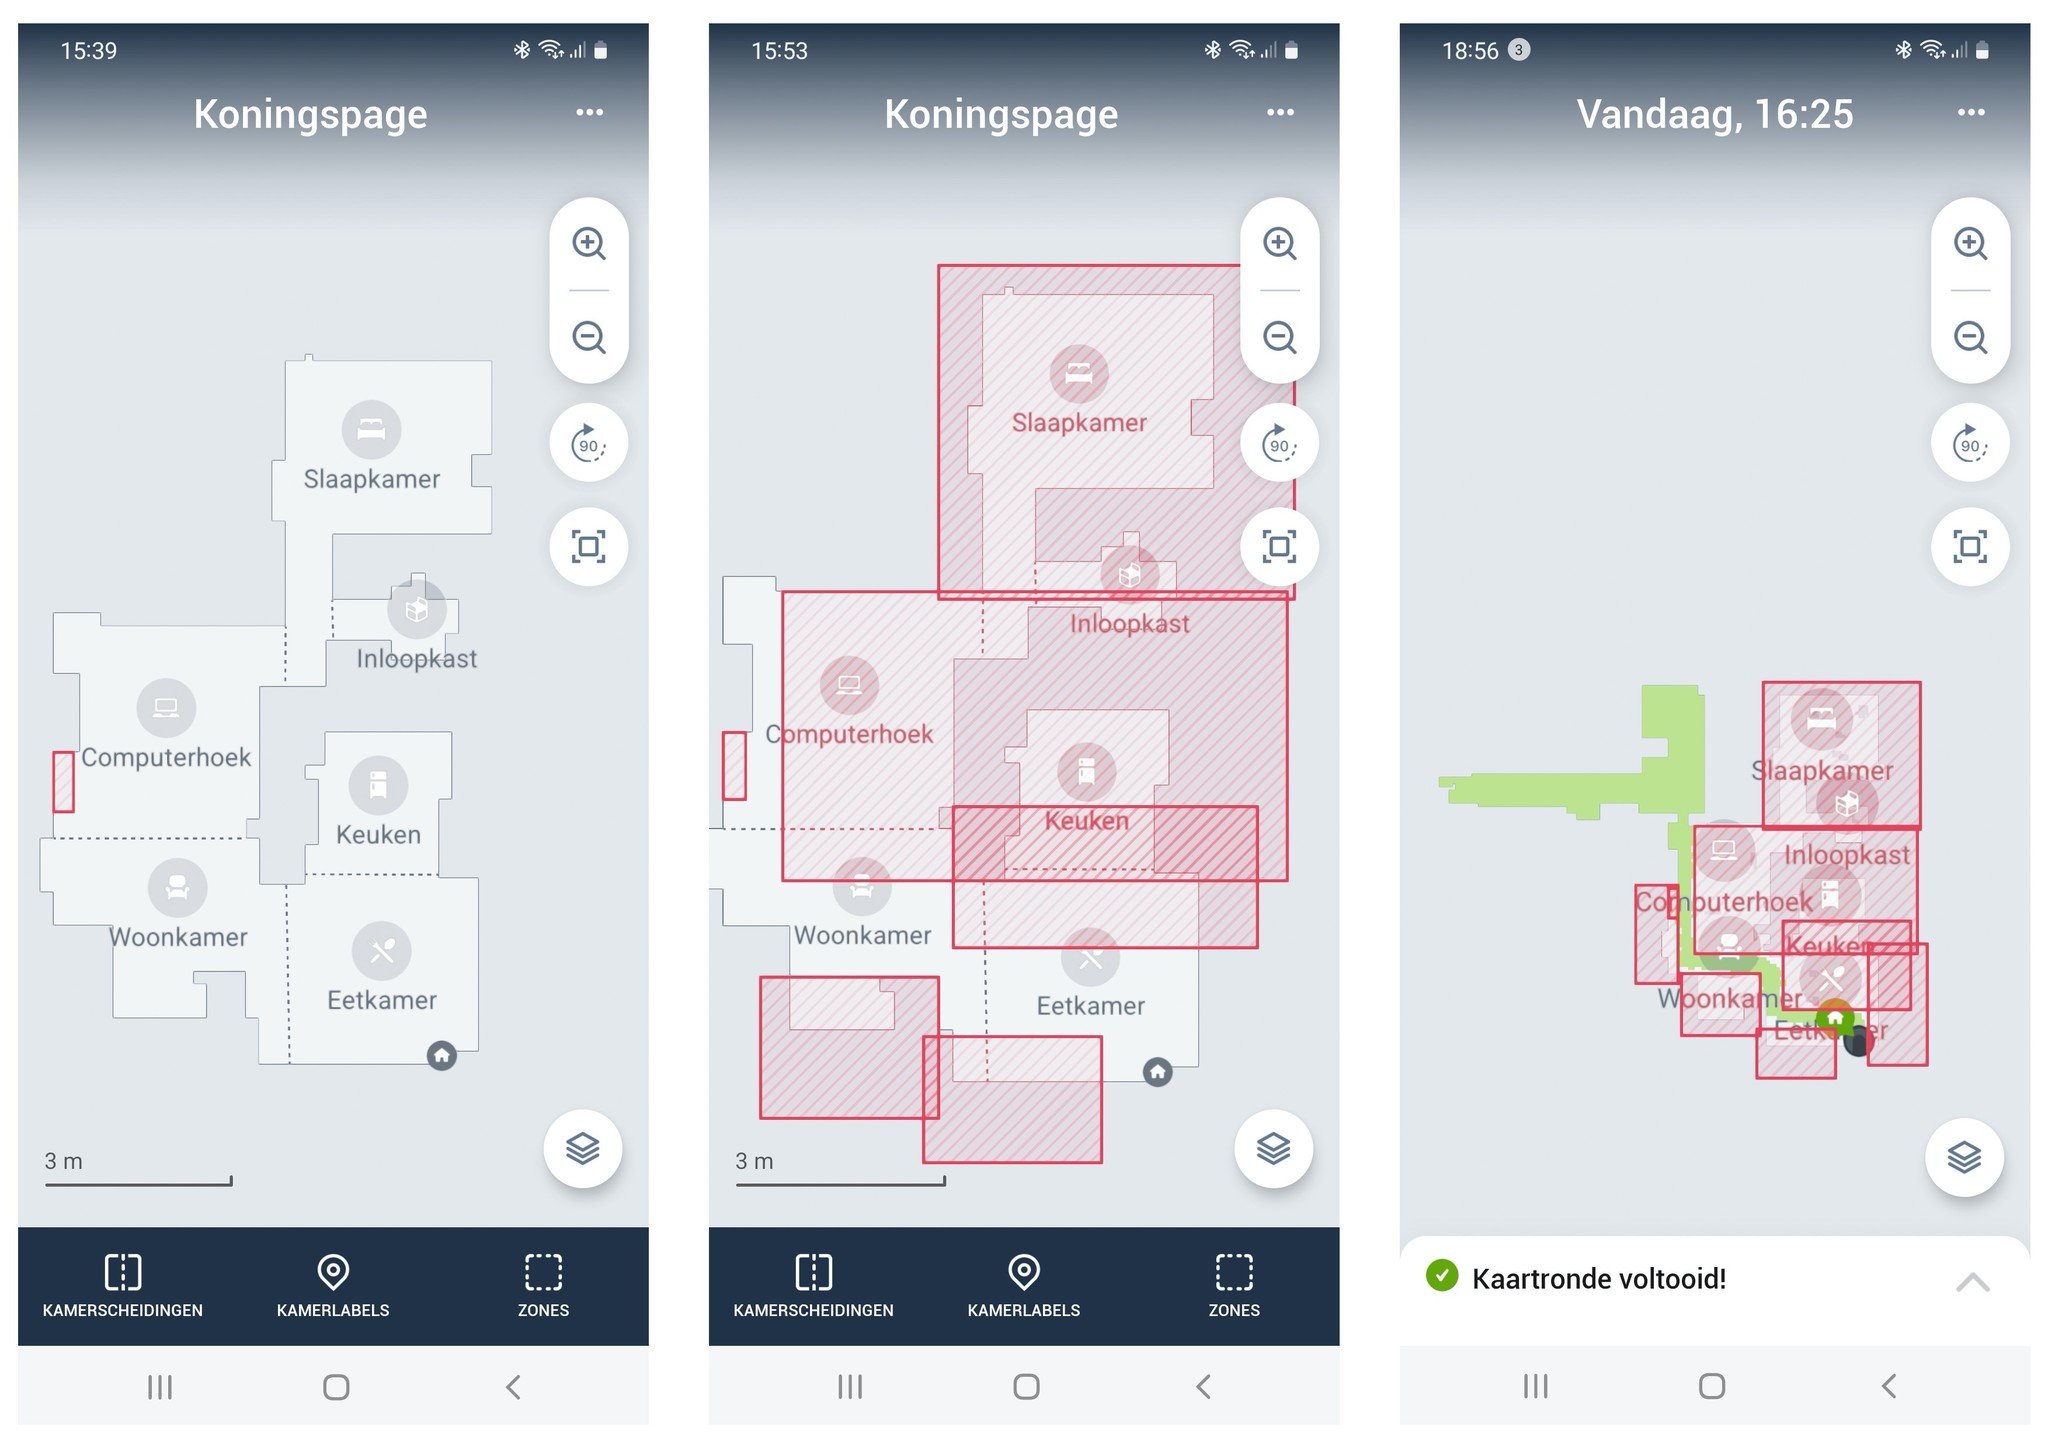
Experience from one of our customers. Add a map in the iRobot app
ERWIN:
Here is a step-by-step plan to quickly add a new space to an existing map in the Irobot app. If you try this in a normal map, the vacuum cleaner will first go through all the rooms again before it possibly recognizes a new room. Especially if you already have a decent amount of space in your map. (Photo 1) This can be done much faster by first zoning most of your map. And NoGo zones. (photo 2) If you now let the vacuum cleaner perform another round for mapping, it will quickly go through the free spaces and arrive much faster in the new area. However, after your vacuum cleaner is back at the base, your map will not have been adjusted yet. You will then see the former map. However, now go to your history overview and you will see Today time and duration. Click on the arrow behind it and you will see a new map overview like mine from Today 16:25 (photo 3). Here you DO see the new area in the map. At the top right are 3 dots, click on this and you will see the option Update my Smart Map (photo 4). Click on this and your map will be updated. Now you can delete the NoGo zones and label the new rooms and your map is up to date.